参考代码
一、Autotools 脚本工具 autogen.sh:[参考文章]
#!/bin/sh
echo "Running aclocal..." ; aclocal $ACLOCAL_FLAGS || exit 1
echo "Running autoconf..." ; autoconf || exit 1
echo "Running autoheader..." ; autoheader || exit 1
echo "Running automake..." ; automake --add-missing --copy --gnu || exit 1
./configure "$@"
二、确保有配置文件:configure.ac (根目录下1个) 、Makefile.am (每个目录下各1个)
/configure.ac 文件内容:
#                                               -*- Autoconf -*-
# Process this file with autoconf to produce a configure script.

AC_PREREQ([2.69])
AC_INIT(study_cc, 1.0, phpgo8642@163.com)
AC_CONFIG_SRCDIR([main.c])
AC_CONFIG_HEADERS([config.h])

AM_INIT_AUTOMAKE()			#【新增加】

# Checks for programs.
AC_PROG_CC

# Checks for libraries.

# Checks for header files.
AC_CHECK_HEADERS([stdlib.h])

# Checks for typedefs, structures, and compiler characteristics.

# Checks for library functions.

AC_CONFIG_FILES(			#【新增加】
    Makefile
    src/Makefile
)
AC_OUTPUT
/Makefile.am 文件内容:
SUBDIRS=src
/src/Makefile.am 文件内容:
bin_PROGRAMS=main
main_SOURCES=main.c common.h common.c
关于Autotools
我们前面的章节中已经讲到了Makefile的使用(点击进入查看文章)。我们知道在Linux下面如果编译一个比较大型的项目,我们可以通过Makefile的方式来完成。
但是,我们又蛋疼了,Makefile拥有复杂的语法结构,甚至让人难以领会,当我们项目非常大的时候,维护Makefile会成为一件非常头疼的事情。于是我们就有了Autotools工具,专门用来生成Makefile,这个工具让我们很大程度的降低了开发的难度。
Autotools并不是一个工具,而是一系列工具:
- autoscan
- aclocal
- autoconf
- autoheader
- automake
记住,这一系列工具看着复杂,最终的目标还是生成Makefile
一般情况下系统中都会默认安装这一系列工具,如果未安装,则在CenterOS中可以通过下面命令安装:
sudo yum install automake
C源文件同一目录下Autotools的使用
如果你的源文件都放在同一个目录下面,那么使用Autotools的时候会相对简单很多。比较著名的开源软件Memcache也是放在同一目录下的,你可以去看下它的源码包。
下面会按照步骤来实现同一目录下的Autotools工具的使用。
1. 源代码例子
入口文件main.c
#include <stdio.h>
#include <stdlib.h>
#include <unistd.h>
#include "sum.h"
#include "get.h"


//入口主函数
int main() {
    int x = 10;
    int y = 20;
    int z = sum(&x, &y);
    puts("This is Main");
    printf("Z:%d\n", z);
    x = 20;
    z = get(&x, &y);
    printf("Z:%d\n", z);
    return 1;
}
sum.h 和 sum.c
#include <stdio.h>
#include <stdlib.h>
#include <unistd.h>

int sum(int *x, int *y);
#include "sum.h"
#include "val.h"

int sum(int *x, int *y) {
	val(x);
	puts("This is SUM Method!=========HDH");
	return *x + *y;
}
val.h 和 val.c
#include <stdio.h>
#include <stdlib.h>
#include <unistd.h>

int val(int *x);
#include "val.h"

int val(int *x) {
	puts("This is Value==");
	printf("X:%d \n", *x);
	return 0;
}
get.h 和 get.c
#include <stdio.h>
#include <stdlib.h>
#include <unistd.h>

int get(int *x, int *y);
#include "get.h"

int get(int *x, int *y) {
	puts("This is get");
	return (*x) * (*y);
}
上面这个例子,我们在Makefile这篇文章中已经讲解过如何来手工编写Makefile编译。这边的话我们继续使用这个例子,实现Autotools的工具编译。
[admin@localhost test_c2]$ ls
get.c  get.h  main.c  sum.c  sum.h  val.c  val.h
2. Autoscan命令
第一步,我们需要在我们的项目目录下执行autoscan命令。这个命令主要用于扫描工作目录,并且生成configure.scan文件。并且configure.scan需要重命令成configure.ac,然后编辑这个配置,我们才能继续执行后面的命令。
[admin@localhost test_c2]$ autoscan
[admin@localhost test_c2]$ ls
autoscan.log  configure.scan  get.c  get.h  main.c  sum.c  sum.h  val.c  val.h
[admin@localhost test_c2]$ mv configure.scan configure.ac
[admin@localhost test_c2]$ ls
autoscan.log  configure.ac  get.c  get.h  main.c  sum.c  sum.h  val.c  val.h
我们需要编辑configure.ac文件,首先我们打开configure.ac文件:
#                                               -*- Autoconf -*-
# Process this file with autoconf to produce a configure script.

AC_PREREQ([2.69])
AC_INIT([FULL-PACKAGE-NAME], [VERSION], [BUG-REPORT-ADDRESS])
AC_CONFIG_SRCDIR([main.c])
AC_CONFIG_HEADERS([config.h])

# Checks for programs.
AC_PROG_CC

# Checks for libraries.

# Checks for header files.
AC_CHECK_HEADERS([stdlib.h unistd.h])

# Checks for typedefs, structures, and compiler characteristics.

# Checks for library functions.

AC_OUTPUT
我们修改成:
#                                               -*- Autoconf -*-
# Process this file with autoconf to produce a configure script.

AC_PREREQ([2.69])
AC_INIT(hello,1.0,test@qq.com)
AM_INIT_AUTOMAKE(hello,1.0)
AC_CONFIG_SRCDIR([main.c])
AC_CONFIG_HEADERS([config.h])

AM_INIT_AUTOMAKE()            #【新增加】

# Checks for programs.
AC_PROG_CC

# Checks for libraries.

# Checks for header files.
AC_CHECK_HEADERS([stdlib.h unistd.h])

# Checks for typedefs, structures, and compiler characteristics.

# Checks for library functions.
AC_CONFIG_FILES(Makefile)	#【新增加】
AC_OUTPUT
configure.ac标签说明:
|
标签 |
说明 |
|
AC_PREREQ |
声明autoconf要求的版本号 |
|
AC_INIT |
定义软件名称、版本号、联系方式 |
|
AM_INIT_AUTOMAKE |
必须要的,参数为软件名称和版本号 |
|
AC_CONFIG_SCRDIR |
宏用来侦测所指定的源码文件是否存在, 来确定源码目录的有效性.。此处为当前目录下main.c。 |
|
AC_CONFIG_HEADER |
宏用于生成config.h文件,以便 autoheader 命令使用。 |
|
AC_PROG_CC |
指定编译器,默认GCC |
|
AC_CONFIG_FILES |
生成相应的Makefile文件,不同文件夹下的Makefile通过空格分隔。例如:AC_CONFIG_FILES([Makefile src/Makefile]) |
|
AC_OUTPUT |
用来设定 configure 所要产生的文件,如果是makefile,configure 会把它检查出来的结果带入makefile.in文件产生合适的makefile。 |
3. Aclocal命令
第二步,执行aclocal命令。扫描 configure.ac 文件生成 aclocal.m4文件,该文件主要处理本地的宏定义,它根据已经安装的宏、用户定义宏和 acinclude.m4 文件中的宏将 configure.ac 文件需要的宏集中定义到文件 aclocal.m4 中。
[admin@localhost test_c2]$ aclocal
[admin@localhost test_c2]$ ls
aclocal.m4  autom4te.cache  autoscan.log  configure.ac  get.c  get.h  main.c  sum.c  sum.h  val.c  val.h
4. Autoconf命令
第三步,执行autoconf命令。这个命令将 configure.ac 文件中的宏展开,生成 configure 脚本。这个过程可能要用到aclocal.m4中定义的宏。
[admin@localhost test_c2]$ autoconf
[admin@localhost test_c2]$ ls
aclocal.m4  autom4te.cache  autoscan.log  configure  configure.ac  get.c  get.h  main.c  sum.c  sum.h  val.c  val.h
[admin@localhost test_c2]$
5. Autoheader命令
第四步,执行autoheader命令。该命令生成 config.h.in 文件。该命令通常会从 "acconfig.h” 文件中复制用户附加的符号定义。该例子中没有附加的符号定义, 所以不需要创建 "acconfig.h” 文件。
6. 创建Makefile.am文件
第五步,创建Makefile.am文件。Automake工具会根据 configure.ac 中的参量把 Makefile.am 转换成 Makefile.in 文件。最终通过Makefile.in生成Makefile文件,所以Makefile.am这个文件非常重要,定义了一些生成Makefile的规则
Makefile.am:
AUTOMARK_OPTIONS = foreign
bin_PROGRAMS = hello
hello_SOURCES = main.c val.h val.c get.h get.c sum.h sum.c
1. AUTOMAKE_OPTIONS:由于GNU对自己发布的软件有严格的规范, 比如必须附带许可证声明文件COPYING等,否则automake执行时会报错. automake提供了3种软件等级:foreign, gnu和gnits,供用户选择,默认级别是gnu。在本例中, 使用了foreign等级,它只检测必须的文件。
2. bin_PROGRAMS = hello :生成的可执行文件名称,生成多个可执行文件,可以用空格隔开。
3. hello_SOURCES:生成可执行文件hello需要依赖的源文件。其中hello_为可执行文件的名称。
具体Makefile.am后面我们会有一个章节专门讲这块内容。
7. Automake命令
第六步,执行automake --add-missing命令。该命令生成 Makefile.in 文件。使用选项 "--add-missing" 可以让 Automake 自动添加一些必需的脚本文件。如果发现一些文件不存在,可以通过手工 touch命令创建。
[admin@localhost test_c2]$ automake --add-missing
configure.ac:6: warning: AM_INIT_AUTOMAKE: two- and three-arguments forms are deprecated.  For more info, see:
configure.ac:6: http://www.gnu.org/software/automake/manual/automake.html#Modernize-AM_005fINIT_005fAUTOMAKE-invocation
configure.ac:6: installing './install-sh'
configure.ac:6: installing './missing'
Makefile.am: installing './INSTALL'
Makefile.am: error: required file './NEWS' not found
Makefile.am: error: required file './README' not found
Makefile.am: error: required file './AUTHORS' not found
Makefile.am: error: required file './ChangeLog' not found
Makefile.am: installing './COPYING' using GNU General Public License v3 file
Makefile.am:     Consider adding the COPYING file to the version control system
Makefile.am:     for your code, to avoid questions about which license your project uses
Makefile.am: installing './depcomp'
[admin@localhost test_c2]$ touch NEWS
[admin@localhost test_c2]$ touch README
[admin@localhost test_c2]$ touch AUTHORS
[admin@localhost test_c2]$ touch ChangeLog
[admin@localhost test_c2]$ automake --add-missing
[admin@localhost test_c2]$ ls
aclocal.m4  autom4te.cache  ChangeLog    configure     COPYING  get.c  INSTALL     main.c       Makefile.in  NEWS    sum.c  val.c
AUTHORS     autoscan.log    config.h.in  configure.ac  depcomp  get.h  install-sh  Makefile.am  missing      README  sum.h  val.h
8. configure命令
第七步,估计大家都对 ./congigure这个命令很熟悉吧。大部分Linux软件安装都先需要执行./congigure,然后执行make和make install命令。
./congigure主要把 Makefile.in 变成最终的 Makefile 文件。configure会把一些配置参数配置到Makefile文件里面。
./configure
#具体命令省了
#可以看到生成了Makefile配置文件
[admin@localhost test_c2]$ ls
aclocal.m4  autom4te.cache  ChangeLog  config.h.in  config.status  configure.ac  depcomp  get.h
install-sh  Makefile     Makefile.in  NEWS
stamp-h1  sum.h  val.h
AUTHORS     autoscan.log    config.h   config.log   configure      COPYING       get.c    INSTALL  main.c
 Makefile.am  missing
README  sum.c     val.c
9. make命令
第八步,执行make命令,执行make命令后,就生成了可执行文件hello。
[admin@localhost test_c2]$ make
make  all-am
make[1]: 进入目录“/home/admin/test_c2”
gcc -DHAVE_CONFIG_H -I.     -g -O2 -MT main.o -MD -MP -MF .deps/main.Tpo -c -o main.o main.c
mv -f .deps/main.Tpo .deps/main.Po
gcc -DHAVE_CONFIG_H -I.     -g -O2 -MT val.o -MD -MP -MF .deps/val.Tpo -c -o val.o val.c
mv -f .deps/val.Tpo .deps/val.Po
gcc -DHAVE_CONFIG_H -I.     -g -O2 -MT get.o -MD -MP -MF .deps/get.Tpo -c -o get.o get.c
mv -f .deps/get.Tpo .deps/get.Po
gcc -DHAVE_CONFIG_H -I.     -g -O2 -MT sum.o -MD -MP -MF .deps/sum.Tpo -c -o sum.o sum.c
mv -f .deps/sum.Tpo .deps/sum.Po
gcc  -g -O2   -o hello main.o val.o get.o sum.o
make[1]: 离开目录“/home/admin/test_c2”
[admin@localhost test_c2]$ ls
aclocal.m4  autom4te.cache  ChangeLog  config.h.in  config.status  configure.ac  depcomp  get.h
hello    install-sh  main.o    Makefile.am  missing  README    sum.c  sum.o  val.h
AUTHORS     autoscan.log    config.h   config.log   configure      COPYING       get.c
get.o  INSTALL  main.c      Makefile  Makefile.in  NEWS     stamp-h1  sum.h  val.c  val.o
[admin@localhost test_c2]$ ./hello
This is Value==
X:10
This is SUM Method!=========HDH
This is Main
Z:30
This is get
Z:400
C源文件不同目录下Autotools的使用
如果你的入口文件main.c和依赖的文件不是在同一个目录中的,使用Autotools来管理项目的时候会稍微复杂一下。
在不同的目录下,项目会生成*.a文件的静态连接(静态连接相当于将多个.o目标文件合成一个)。最外层的main.c会通过静态连接方式来实现连接。
1. 源代码例子
这个例子中会加入libevent和pthread,让例子稍显复杂,这样可以详细的介绍不同目录下的Autotools的使用。
我们创建两个目录:
include/ :放置.h头文件
src/ :放置.c 源文件
[admin@localhost test_c3]$ ls
include  main.c  src
入口文件main.c:
#include "include/common.h"

//入口主函数
int main() {
    puts("当前线程sleep 2秒");
    sleep(2);
    int x = 10;
    int y = 20;
    int z = sum(&x, &y);
    puts("This is Main");
    printf("Z:%d\n", z);
    x = 20;
    z = get(&x, &y);
    printf("Z:%d\n", z);
    return 1;
}
common.h文件:
#include <stdio.h>
#include <stdlib.h>
#include <unistd.h>
#include <event2/event.h>
#include <event2/bufferevent.h>
#include <pthread.h>
get.h:
int get(int *x, int *y);
sum.h
int sum(int *x, int *y);
val.h
#include "common.h"
int val(int *x);
get.c
#include "../include/common.h"
#include "../include/get.h"

int get(int *x, int *y) {
	puts("This is get");
	return (*x) * (*y);
}
sum.c
#include "../include/common.h"
#include "../include/sum.h"
#include "../include/val.h"

int sum(int *x, int *y) {
	val(x);
	puts("This is SUM Method!==============HDH");
	return *x + *y;
}
val.c
#include "../include/common.h"
#include "../include/val.h"

int val(int *x) {
	// 引入 libevent的方法
	struct event_base *base;
	base = event_base_new();
	const char *y = event_base_get_method(base);
	printf("METHOD:%s\n", y);
	event_base_free(base); 	// 销毁libevent

	puts("This is Value==");
	printf("X:%d \n", *x);
	return 0;
}
2. 创建Makefile.am文件
在项目根目录下先创建Makefile.am文件。
AUTOMAKE_OPTIONS=foreign        #软件等级
SUBDIRS=src                     #先扫描子目录
bin_PROGRAMS=hello              #软件生成后的可执行文件名称
hello_SOURCES=main.c            #当前目录源文件
hello_LDADD=src/libpro.a        #静态连接方式 连接src下生成的libpro.a文件
LIBS = -l pthread -l event      #因为我们项目中用到了libevent和pthread,这个是动态连接
在src/目录下创建Makefile.am文件。
noinst_LIBRARIES=libpro.a               #生成的静态库文件名称,noinst加上之后是只编译,不安装到系统中。
libpro_a_SOURCES=sum.c get.c val.c      #这个静态库文件需要用到的依赖
include_HEADERS=../include/common.h ../include/sum.h ../include/get.h ../include/val.h  #导入需要依赖的头文件
说明:src/目录下面不加include_HEADERS也是可以运行的,但是在使用make dist打包命令后,并不会将include/文件夹打包进去,所以还是需要加上include_HEADERS。
3. 执行Autoscan命令
第一步,我们需要在我们的项目目录下执行autoscan命令。这个命令主要用于扫描工作目录,并且生成configure.scan文件。并且configure.scan需要重命令成configure.ac,然后编辑这个配置,我们才能继续执行后面的命令。
[admin@localhost test_c3]$ autoscan
[admin@localhost test_c3]$ ls
autoscan.log  configure.scan  include  main.c  Makefile.am  src
修改configure.ac文件,主要添加AC_PROG_RANLIB(生成静态库);AC_PROG_LIBTOOL(用来生成动态库)
#                                               -*- Autoconf -*-
# Process this file with autoconf to produce a configure script.

AC_PREREQ([2.69])
AC_CONFIG_SRCDIR([main.c])
AC_INIT(hello,1.0,abc@126.com)
AM_INIT_AUTOMAKE(hello,1.0)
AC_PROG_RANLIB
AC_CONFIG_HEADERS([config.h])

# Checks for programs.
AC_PROG_CC

# Checks for libraries.

# Checks for header files.
AC_CHECK_HEADERS([stdlib.h unistd.h])

# Checks for typedefs, structures, and compiler characteristics.

# Checks for library functions.

AC_CONFIG_FILES([Makefile
                 src/Makefile])
AC_OUTPUT
4. Aclocal命令
第二步,执行aclocal命令。扫描 configure.ac 文件生成 aclocal.m4文件, 该文件主要处理本地的宏定义,它根据已经安装的宏、用户定义宏和 acinclude.m4 文件中的宏将 configure.ac 文件需要的宏集中定义到文件 aclocal.m4 中。
[admin@localhost test_c3]$ aclocal
[admin@localhost test_c3]$ ls
aclocal.m4  autom4te.cache  autoscan.log  configure.ac  include  main.c  Makefile.am  src
5. Autoconf命令
第三步,执行autoconf命令。这个命令将 configure.ac 文件中的宏展开,生成 configure 脚本。这个过程可能要用到aclocal.m4中定义的宏。
[admin@localhost test_c3]$ autoconf
[admin@localhost test_c3]$ ls
aclocal.m4      autoscan.log  configure.ac  main.c       src
autom4te.cache  configure     include       Makefile.am
6. Autoheader命令
第四步,执行autoheader命令。该命令生成 config.h.in 文件。该命令通常会从 "acconfig.h” 文件中复制用户附加的符号定义。该例子中没有附加的符号定义, 所以不需要创建 "acconfig.h” 文件。
[admin@localhost test_c3]$ autoheader
[admin@localhost test_c3]$ ls
aclocal.m4      autoscan.log  configure     include  Makefile.am
autom4te.cache  config.h.in   configure.ac  main.c   src
7. Automake命令
第五步,执行automake --add-missing命令。该命令生成 Makefile.in 文件。使用选项 "--add-missing" 可以让 Automake 自动添加一些必需的脚本文件。如果发现一些文件不存在,可以通过手工 touch命令创建。
[admin@localhost test_c3]$ touch NEWS
[admin@localhost test_c3]$ touch README
[admin@localhost test_c3]$ touch AUTHORS
[admin@localhost test_c3]$ touch ChangeLog
[admin@localhost test_c3]$ automake --add-missing
configure.ac:7: warning: AM_INIT_AUTOMAKE: two- and three-arguments forms are deprecated.  For more info, see:
configure.ac:7: http://www.gnu.org/software/automake/manual/automake.html#Modernize-AM_005fINIT_005fAUTOMAKE-invocation
[admin@localhost test_c3]$ ls
aclocal.m4      autoscan.log  configure     include     Makefile.am  NEWS
AUTHORS         ChangeLog     configure.ac  install-sh  Makefile.in  README
autom4te.cache  config.h.in   depcomp       main.c      missing      src
8. configure命令
第六步,执行./configure命令。./congigure主要把 Makefile.in 变成最终的 Makefile 文件。configure会把一些配置参数配置到Makefile文件里面。
[admin@localhost test_c3]$ ./configure
#命令省了
[admin@localhost test_c3]$ ls
aclocal.m4      ChangeLog    config.status  hello       main.o       missing  stamp-h1
AUTHORS         config.h     configure      include     Makefile     NEWS
autom4te.cache  config.h.in  configure.ac   install-sh  Makefile.am  README
autoscan.log    config.log   depcomp        main.c      Makefile.in  src
9. make命令
第七步,执行make命令。make执行后,会生成hello的可执行文件。
[admin@localhost test_c3]$ make
make  all-recursive
make[1]: 进入目录“/home/admin/test_c3”
Making all in src
make[2]: 进入目录“/home/admin/test_c3/src”
gcc -DHAVE_CONFIG_H -I. -I..     -g -O2 -MT sum.o -MD -MP -MF .deps/sum.Tpo -c -o sum.o sum.c
mv -f .deps/sum.Tpo .deps/sum.Po
gcc -DHAVE_CONFIG_H -I. -I..     -g -O2 -MT val.o -MD -MP -MF .deps/val.Tpo -c -o val.o val.c
mv -f .deps/val.Tpo .deps/val.Po
rm -f libpro.a
ar cru libpro.a sum.o get.o val.o
ranlib libpro.a
make[2]: 离开目录“/home/admin/test_c3/src”
make[2]: 进入目录“/home/admin/test_c3”
gcc -DHAVE_CONFIG_H -I.     -g -O2 -MT main.o -MD -MP -MF .deps/main.Tpo -c -o main.o main.c
mv -f .deps/main.Tpo .deps/main.Po
gcc  -g -O2   -o hello main.o src/libpro.a  -l pthread -l event
make[2]: 离开目录“/home/admin/test_c3”
make[1]: 离开目录“/home/admin/test_c3”
[admin@localhost test_c3]$ ./hello
当前线程sleep 2秒
METHOD:epoll
This is Value==
X:10
This is SUM Method!=========HDH
This is Main
Z:30
This is get
Z:400
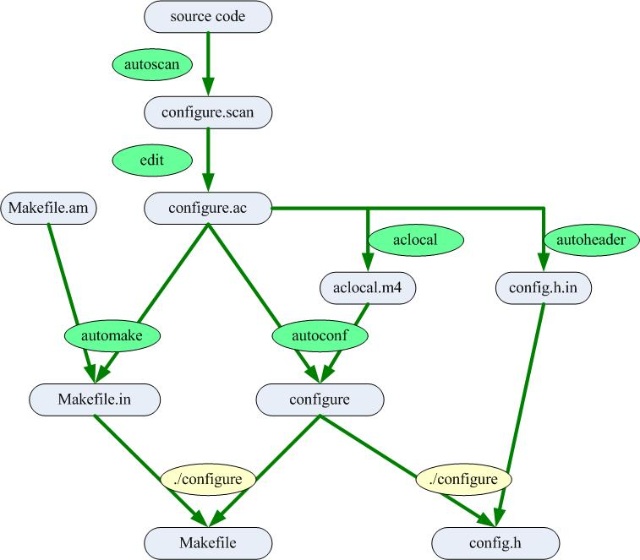
Autotools运行流程
流程总结:
1. 执行autoscan命令。这个命令主要用于扫描工作目录,并且生成configure.scan文件。
2. 修改configure.scan为configure.ac文件,并且修改配置内容。
3. 执行aclocal命令。扫描 configure.ac 文件生成 aclocal.m4文件。
4. 执行autoconf命令。这个命令将 configure.ac 文件中的宏展开,生成 configure 脚本。
5. 执行autoheader命令。该命令生成 config.h.in 文件。
6. 新增Makefile.am文件,修改配置内容
7. 执行automake --add-missing命令。该命令生成 Makefile.in 文件。
8. 执行 ./congigure命令。将Makefile.in命令生成Makefile文件。
9. 执行make命令。生成可执行文件。
流程图:
Make命令详解
1. make命令:编译文件。make命令主要通过Makefile文件生成可执行文件。
2. make clean命令。清楚编译的文件,包括目标文件*.o和可执行文件
3. make install 命令把目标文件安装到系统中。默认安装到/usr/local/bin目录下面。
4. make uninstall 命令,把目标文件从系统中卸载。
5. make dist 命令,打包发布。
如何使用发布的文件:
1. 下载到“hello-1.0.tar.gz”压缩文档
2. 使用“ tar -zxvf hello-1.0.tar.gz ”命令解压
3. 使用 “./configure” 命令,主要是生成Makefile配置文件,已经一些配置初始化。
4. 使用 “make” 命令编译源代码文件生成软件包。
5. 使用“make install ”命令来安装编译后的软件包到系统中。
Makefile.am解读
1. 可执行文件类型
可执行文件类型主要是只最终生成的可执行的文件。例如我们上面“C源文件同一目录下Autotools的使用”中的例子。
|
书写格式 |
说明 |
|
bin_PROGRAMS |
生成的可执行文件名称。如果生成的可执行文件名称为多个,则可以通过空格的方式分隔。 bin_PROGRAMS:当运行make install命令的时候,可执行文件会默认安装到linux系统的/usr/local/bin目录下面 noinst_PROGRAMS:如果make install的时候不想被安装,可以使用noinst_PROGRAMS命令。 例子:bin_PROGRAMS=hello |
|
hello_SOURCES |
编译成可执行文件所依赖的.c源文件。多个源文件之间用空格分隔。hello为可执行文件名称。 |
|
hello_LDADD |
编译成可执行文件过程中,连接所需的库文件,包括*.so的动态库文件和.a的静态库文件。 |
|
hello_LDFLAGS |
连接的时候所需库文件的标识 |
bin_PROGRAMS=hello          #软件生成后的可执行文件名称为hello
hello_SOURCES=main.c        #当前目录源文件,如果当前目录有多个源文件,通过空格进行分隔
hello_LDADD=src/libpro.a    #连接的时候所需的库文件
hello_LDFLAGS=              #连接的时候所需库文件的标识
LIBS= -l pthread -l event   #第三方的库
2. 静态库文件类型
静态库文件类型,一般会将c源码放在不同的文件夹中,并且每个文件夹中都会有各自的Makefile.am文件,并且会被编译成静态链接库 *.a格式的文件。
如果对静态库和动态库还没有一个概念,可以看我的《Linux c 开发 - 静态库和动态库》
注意:静态库使用中,需要对 configure.ac 中加入 AC_PROG_RANLIB
|
书写格式 |
说明 |
|
noinst_LIBRARIES |
生成静态库(*.a)或者动态库(*.so)的名称。 库文件一般以lib*.a或者lib*.so来命名。 noinst_LIBRARIES:当运行make install的时候,库文件不会被安装到linux默认的/usr/local/lib目录下。 lib_LIBRARIES:当运行make intsall的时候,则会被安装到/usr/local/lib目录下。 下面的例子:noinst_LIBRARIES=libpro.a |
|
libpro_a_SOURCES |
C的源文件,libpro_a即上面的livpro.a。多个文件用空格分开。 |
|
libpro_a_LDADD |
加载所需的库文件。 |
|
libpro_a_LDFLAGS |
编译的时候的连接标识。 |
noinst_LIBRARIES=libpro.a           #生成的静态库文件名称,noinst加上之后是只编译,不安装到系统中。
libpro_a_SOURCES=sum.c get.c val.c  #这个静态库文件需要用到的源文件。
libpro_a_LDADD =                    #加载库文件
libpro_a_LDFLAGS=                   #连接的时候所需库文件的标识
3. 头文件
我们一般需要导入一些*.h的头文件,如果你在Makefile.am中没有标识需要导入的头文件,可能在make dist打包的时候出现问题,头文件可能不会被打进包里面。
include_HEADERS=../include/common.h ../include/sum.h ../include/get.h ../include/val.h #可以将头文件引入
make install,头文件默认会被安装到Linux系统/usr/local/include
4. 数据文件
data_DATA = data1 data2
5. 常用变量
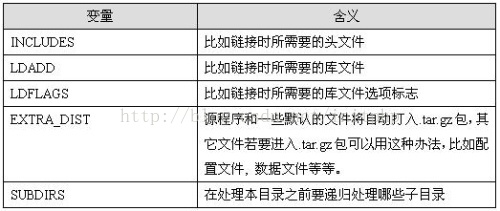
AUTOMAKE_OPTIONS=foreign    #软件等级
SUBDIRS=src                 #先扫描子目录,多个目录用空格隔开
LIBS = -l pthread -l event  #因为我们项目中用到了libevent和pthread,这个是动态连接,在编译的时候会自动加上 -l pthread -l event
EXTRA_DIST = conf           #打包一些配置文件
6. 安装目录
我们知道,默认情况下,执行make install命令,则会将文件安装到/usr/local/bin /usr/local/include /usr/local/lib目录下面。
我们可以通过命令 ./configure --prefix= 生成Makefile文件的时候,配置make install命令执行的时候的文件安装路径。
下面这个例子,我们在执行make install的时候,程序会被安装到/home/test目录下面。
./configure --prefix=/home/test
执行下面一系列命令:
./configure --prefix=/home/test
make
sudo make install
我们可以进入/home/test目录下看到相应的bin文件已经生成:
[admin@localhost test]$ ls
bin  include lib
下面这些变量是已经定义好的安装路径的变量。
用户也可以修改这些变量。例如将bindir修改成 $(prefix)/bin2
bindir = $(prefix)/bin。

libdir = $(prefix)/lib。

datadir=$(prefix)/share。

sysconfdir=$(prefix)/etc。

includedir=$(prefix)/include。
假如我们有自定义的文件夹,我们需要将这个文件夹下的内容安装到安装目录,
则需要配置一个自定义的文件夹目录confdir
confdir=${prefix}/conf  #conf为名称  dir为每个文件夹变量必须带上
conf_DATA=conf/*        #这个是将conf/目录下的内容安装到confdir目录下
EXTRA_DIST=conf         #在make dist打包的时候 也要将扩展文件夹打包进去
confdir为需要创建的文件夹目录。
conf_DATA为需要拷贝的文件内容到${prefix}/conf目录中去
摘自: