利用 Spring Boot 来制作 Web 应用,就必定会涉及到前端与后台之间互相传递参数。下面演示 Controller 如何接收以 GET 方式传递过来的参数。
一、参数直接在路径中
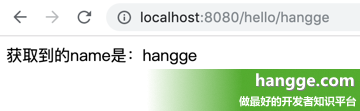
(1)假设请求地址是如下这种 RESTful 风格,hangge 这个参数值直接放在路径里面:
http://localhost:8080/hello/hangge
(2)Controller 可以这么获取该参数:
package com.example.demo;

import org.springframework.web.bind.annotation.PathVariable;
import org.springframework.web.bind.annotation.RestController;
import org.springframework.web.bind.annotation.GetMapping;

@RestController
public class HelloController {
    @GetMapping("/hello/{name}")
    public String hello(@PathVariable("name") String name) {
        return "获取到的name是:" + name;
    }
}
二、参数跟在 ? 号后面
2.1 获取参数的基本方法
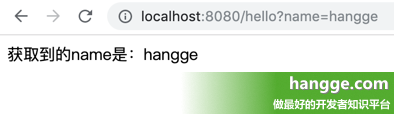
(1)假设请求地址是如下这种传统方式,参数跟在问号后面:
http://localhost:8080/hello?name=hangge
(2)Controller 可以这么获取该参数:
package com.example.demo;

import org.springframework.web.bind.annotation.RequestParam;
import org.springframework.web.bind.annotation.RestController;
import org.springframework.web.bind.annotation.GetMapping;

@RestController
public class HelloController {
    @GetMapping("/hello")
    public String hello(@RequestParam("name") String name) {
        return "获取到的name是:" + name;
    }
}
2.2 参数没有传递的情况
(1)如果没有传递参数 Controller 将会报错,我们可以使用 required = false 标注参数是非必须的。
package com.example.demo;

import org.springframework.web.bind.annotation.RequestParam;
import org.springframework.web.bind.annotation.RestController;
import org.springframework.web.bind.annotation.GetMapping;

@RestController
public class HelloController {
    @GetMapping("/hello")
    public String hello(@RequestParam(name = "name", required = false) String name) {
        return "获取到的name是:" + name;
    }
}

(2)或者可以指定个默认值,当没有传递参数时自动使用默认值:
package com.example.demo;

import org.springframework.web.bind.annotation.RequestParam;
import org.springframework.web.bind.annotation.RestController;
import org.springframework.web.bind.annotation.GetMapping;

@RestController
public class HelloController {
    @GetMapping("/hello")
    public String hello(@RequestParam(name = "name", defaultValue = "xxx") String name) {
        return "获取到的name是:" + name;
    }
}

2.3 使用 map 来接收参数
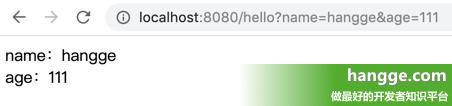
(1)Controller 还可以直接使用 map 来接收所有的请求参数:
package com.example.demo;

import org.springframework.web.bind.annotation.RequestParam;
import org.springframework.web.bind.annotation.RestController;
import org.springframework.web.bind.annotation.GetMapping;

import java.util.Map;

@RestController
public class HelloController {
    @GetMapping("/hello")
    public String hello(@RequestParam Map<String, Object> params) {
        return "name:" + params.get("name") + "<br>age:" + params.get("age");
    }
}
(2)下面是一个简单的测试样例:
2.4 接收一个数组
(1)假设请求地址是如下这种,有多个同名参数:
http://localhost:8080/hello?name=hangge&name=google
(2)我们可以定义一个数组类型的参数来接收:
package com.example.demo;

import org.springframework.web.bind.annotation.RequestParam;
import org.springframework.web.bind.annotation.RestController;
import org.springframework.web.bind.annotation.GetMapping;

@RestController
public class HelloController {
    @GetMapping("/hello")
    public String hello(@RequestParam("name") String[] names) {
        String result = "";
        for(String name:names){
            result += name + "<br>";
        }
        return result;
    }
}

三、使用对象来接收参数
3.1 基本用法
(1)如果一个 get 请求的参数太多,我们构造一个对象来简化参数的接收方式:
package com.example.demo;

import org.springframework.web.bind.annotation.RestController;
import org.springframework.web.bind.annotation.GetMapping;

@RestController
public class HelloController {
    @GetMapping("/hello")
    public String hello(User user) {
        return "name:" + user.getName() + "<br> age:" + user.getAge();
    }
}
(2)User 类的定义如下,到时可以直接将多个参数通过 getter、setter 方法注入到对象中去:
package com.example.demo;

public class User {
    private String name;
    private Integer age;

    public String getName() {
        return name;
    }

    public void setName(String name) {
        this.name = name;
    }

    public Integer getAge() {
        return age;
    }

    public void setAge(Integer age) {
        this.age = age;
    }
}
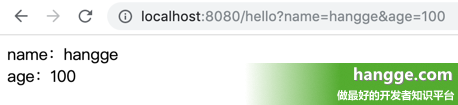
(3)下面是一个简单的测试样例:
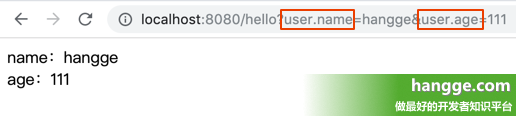
(4)如果传递的参数有前缀,且前缀与接收实体类的名称相同,那么参数也是可以正常传递的:
3.2 指定参数前缀
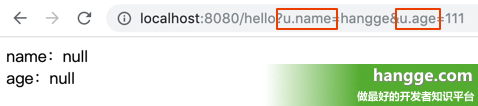
(1)如果传递的参数有前缀,且前缀与接收实体类的名称不同相,那么参数无法正常传递:
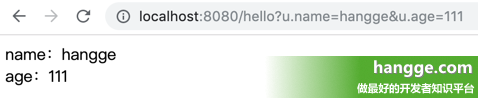
(2)我们可以结合 @InitBinder 解决这个问题,通过参数预处理来指定使用的前缀为 u.
除了在 Controller 里单独定义预处理方法外,我们还可以通过 @ControllerAdvice 结合 @InitBinder 来定义全局的参数预处理方法,方便各个 Controller 使用。具体做法参考我之前的文章:
package com.example.demo;

import org.springframework.web.bind.WebDataBinder;
import org.springframework.web.bind.annotation.*;

@RestController
public class HelloController {
    @GetMapping("/hello")
    public String hello(@ModelAttribute("u") User user) {
        return "name:" + user.getName() + "<br> age:" + user.getAge();
    }

    @InitBinder("u")
    private void initBinder(WebDataBinder binder) {
        binder.setFieldDefaultPrefix("u.");
    }
}
(3)重启程序可以看到参数以及成功接收了:
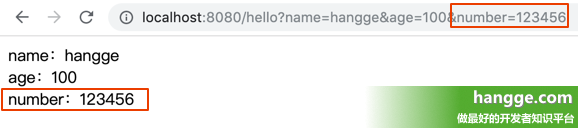
3.3 构造多个对象来接收参数
(1)如果一个 get 请求的参数分属不同的对象,也可以使用多个对象来接收参数:
package com.example.demo;

import org.springframework.web.bind.annotation.RestController;
import org.springframework.web.bind.annotation.GetMapping;

@RestController
public class HelloController {
    @GetMapping("/hello")
    public String hello(User user, Phone phone) {
        return "name:" + user.getName() + "<br> age:" + user.getAge()
                + "<br> number:" + phone.getNumber();
    }
}
(2)新增的 Phone 类定义如下:
package com.example.demo;

public class Phone {
    private String number;

    public String getNumber() {
        return number;
    }

    public void setNumber(String number) {
        this.number = number;
    }
}
(3)下面是一个简单的测试样例: